

How to Set Up Real-Time Analytics for Lead Magnets

If your lead magnet form breaks at 10:15 a.m., waiting until tomorrow to spot it costs leads. I’d set up real-time or near-live tracking around five core events – page views, form starts, form submissions, content access, and downloads – then send that data into GA4, Google Tag Manager, dashboards, and alerts so I can catch drops in conversion rates, spikes in CPL, or delivery issues within minutes.
Here’s the short version:
- I’d decide what business question each event answers before adding any tags. This applies whether you are using lead magnet ideas like checklists or complex calculators.
- I’d track the full path from visit to download, not just form fills.
- I’d use GA4 Realtime and DebugView to test every step before going live.
- I’d build a dashboard around traffic, submissions, source data, CRM stages, and failures.
- I’d set alerts for conversion drops, broken forms, CPL spikes, and odd surges.
- I’d review the setup daily, weekly, and monthly so bad data doesn’t sit there for days.
A few numbers matter here. B2B lead forms often convert in the 10% to 25% range, with a reported median of 17.3% for qualified traffic. So if I see live conversion data fall well below that mark, I know I need to check the page, form, traffic source, or delivery step right away.
What I like about this setup is simple: it turns lead magnet tracking into something I can act on today, not something I review after the damage is done. The goal isn’t more reporting. The goal is clean event tracking, clear dashboards, and alerts that tell me when to step in.
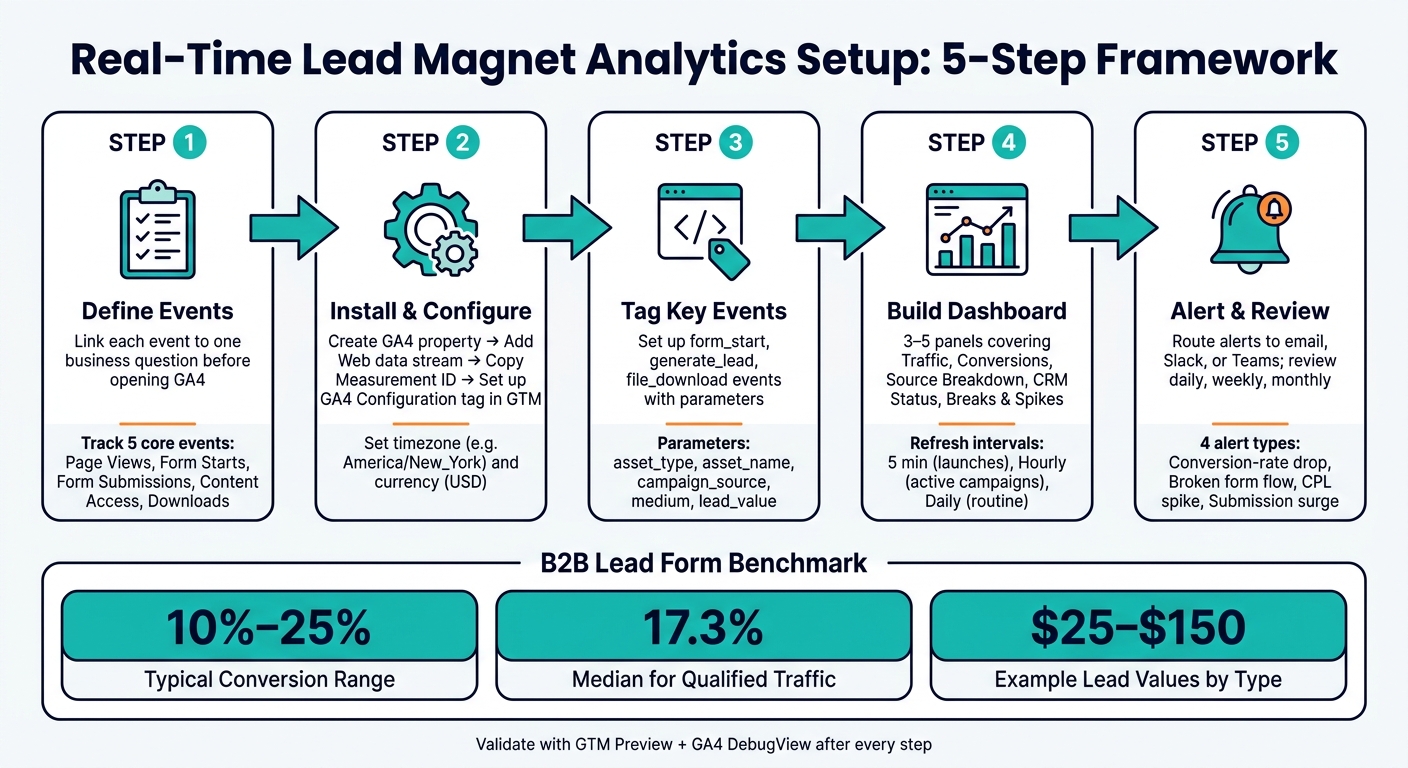
Real-Time Lead Magnet Analytics Setup: 5-Step Framework
Define your measurement plan before installing anything
Use the metrics you picked earlier to decide which events are worth tracking. Before you add a tag or even open GA4, write down the business question the data needs to answer. A measurement plan links each event to one business result. Without that, reports can look busy without telling you much about performance.
Start with your main goal – qualified leads, demo requests, email sign-ups, or sales-ready leads – then work backward. Ask yourself which user actions show that someone is moving toward that goal. From there, map the goal to the events and parameters you plan to tag. That plan becomes your blueprint for GA4 and Tag Manager.
Choose the events and parameters that matter
Start with one schema, not a giant event list. Use a single event schema, then add only the events needed to answer a clear business question, such as scroll_depth_75 for engagement testing or cta_click for button optimization.
Parameters are what make those events useful. Without them, you know something happened, but you don’t know why it matters. Track parameters like asset_type, asset_name, campaign_source, medium, campaign, and lead_value. With those in place, you can compare channel, asset, and lead value in real time.
Here’s a simple example. Say you’re running a whitepaper campaign and tracking form_submit with:
asset_type=whitepaperasset_name=2026_B2B_Lead_Gen_Playbookcampaign_source=linkedinmedium=paid_socialcampaign=q3_lead_genlead_value=75
That single event payload gives you what you need to compare channel performance and content ROI without stitching data together later.
Standardize naming and document triggers
Naming consistency matters, especially when you’re debugging a dashboard and FormSubmit, formSubmitted, and submit_form are all firing for the same action. That’s a mess no one wants. Use snake_case for every event name and parameter key. GA4 limits parameter names to 40 characters and standard values to 100.
Before implementation starts, write a spec for each event. Keep it simple but clear. Include:
- the event name
- when it fires
- required parameters
- the page or component where it lives
- how it will be validated
Also document your consent rules, so tags fire only after a user has given permission when that’s required. And make sure no personally identifiable information appears in any parameter value.
sbb-itb-b3a7196
Set up GA4, Google Tag Manager, and lead magnet tracking

Use the event schema from your measurement plan to connect GA4 and GTM.
Install GA4 and verify data in Realtime and DebugView
Start in Google Analytics. Create a new GA4 property, set the reporting time zone to a U.S. zone like America/New_York, and choose USD ($) as the currency. That keeps event values such as $25.00 and $150.00 lined up in your reports.
Next, add a Web data stream for your lead magnet domain and copy the Measurement ID (G-XXXXXXXXXX). Then go to Google Tag Manager, create a GA4 Configuration tag, paste in the Measurement ID, and set the trigger to All Pages. This is your base tag. It supports every event tag you add after that.
Before you publish anything, open GTM’s Preview mode, load a lead magnet page, and make sure the configuration tag fires. Once that checks out, publish the container. Then open GA4’s Realtime report, visit the page in your browser, and confirm that your session shows up.
After that, switch to DebugView with GTM Preview or the GA Debugger Chrome extension. Walk through the full path:
- page load
- form start
- submission
- unlock
- download
Each step should show up as its own event with the right parameters.
If Realtime shows page views but DebugView misses your custom events, stop there and fix the GTM triggers and event tags before you move on.
Configure form, gated content, and download events in Tag Manager
In GTM, turn on the built-in Form variables under Variables → Configure. Then create a Form Submission trigger to detect when a lead form is completed. Attach a GA4 Event tag to that trigger and pass lead_magnet_name, lead_magnet_type, and form_id as parameters.
Use form_start for the first form interaction and generate_lead for a successful submission.
For gated content access, create a Page View trigger for the thank-you page or gated resource URL, such as /resources/ebook-access. For downloads, enable Link Click variables and trigger clicks on file types like .pdf or .docx. Then fire a file_download event with file_name and lead_magnet_type as parameters.
Mark the lead event as a conversion in GA4 under Configure → Events. When you send these events from GTM, include a numeric value parameter. For example, use 25.00 for a checklist lead or 150.00 for a demo request based on expected lead value. Also add currency: "USD" so there’s no confusion. That lets GA4 report estimated value by lead magnet, not just submission totals.
Once the events are firing the way they should, you can pull them into live dashboards and alerts.
Use Subpage.co analytics and integrations when relevant
Use Subpage.co when you want lead capture and analytics on the same page. Subpage creates standard HTML forms and buttons that work with GTM’s click and form triggers out of the box. That means you can reuse the same trigger setup across all of your lead magnet pages without custom code.
Subpage’s built-in analytics give you a fast snapshot of performance: page views, conversion rates, and lead counts. Its lead capture keeps every submission in one place, and you can export a CSV file to match lead data with GA4 event timestamps in a spreadsheet.
For direct CRM or email platform sync, Subpage’s webhooks and native integrations send lead data as soon as a form is submitted, so follow-up sequences can begin right away.
Build live dashboards and alerts for lead magnet performance
After GA4 and Tag Manager are verified, move those events into a live reporting layer. Once events are firing, turn them into a campaign view your team can use right away.
Create a dashboard with traffic, conversion, and lead quality views
Build a dashboard with three to five panels. Each panel should answer one question and support one action. That keeps the view clean and makes it easier for the team to spot what needs attention.
| Metric group | What it answers | Decision it supports |
|---|---|---|
| Traffic & engagement | Are visitors reaching the lead magnet page right now? | Channel and landing-page optimization |
| Conversions & submissions | Are form fills or downloads happening at the expected rate? | Campaign pacing and funnel troubleshooting |
| Source & campaign breakdown | Which channels produce the best leads? | Budget reallocation and creative decisions |
| CRM status | Are submissions becoming MQLs, SQLs, or opportunities? | Sales follow-up prioritization |
| Breaks and spikes | Is something broken or unusually strong? | Immediate operational response |
Give CRM status extra weight so the dashboard reflects revenue value, not just form volume. A high submission count can look good on the surface, but if those leads never turn into MQLs, SQLs, or opportunities, the picture is incomplete.
Set refresh intervals and connect data sources
Pull GA4 traffic, CRM status, and lead data into one view. Join records with UTMs or lead IDs so you can track what happened from first click to sales outcome.
After the dashboard is built, set the refresh interval based on how fast the team can respond. There’s no point refreshing every five minutes if no one is watching or able to act.
| Refresh interval | Pros | Cons | Best use case |
|---|---|---|---|
| Every 5 minutes | Fast detection of spikes and failures | Higher system load; can surface noisy short-term swings | Paid campaign launches, form-flow troubleshooting |
| Hourly | Balances speed and stability | Not instant for break/fix issues | Active campaign management |
| Daily | Lightweight and easy on systems | Too slow for same-day fixes | Routine monitoring and executive summaries |
If you host gated content on Subpage.co, send submissions and page metrics into the dashboard through its analytics, exports, and webhooks.
Add alerts for sudden drops or spikes
Dashboards show the trend. Alerts catch the break.
Set threshold-based alerts so the team gets notified when something changes in a way that needs attention. A good alert should help someone act, not just add noise.
Start with these four alerts:
- Conversion-rate drop – submissions fall below the 7-day average while traffic holds steady
- Broken form flow – visits continue but completions suddenly stop
- CPL spike – paid acquisition cost rises beyond an acceptable range
- Submission surge – volume rises unusually fast, signaling a successful promotion, duplicate tracking, or spam
Route alerts to email, Slack, or Teams and assign each alert type to one owner. Start with conservative thresholds, watch alert volume for a week, and tighten the rules only after you confirm the notifications are meaningful.
Validate the setup, maintain data quality, and wrap up
Run validation and maintenance on a set schedule
Once your dashboards and alerts are live, the next job is simple: make sure the data is still flowing and stays clean.
Start by checking the full event pipeline from end to end. Run a test submission and download in GTM Preview, GA4 DebugView, and the live dashboard. Then compare the counts and make sure they line up within a narrow margin. If an event shows up in GTM but not in GA4, look at the usual trouble spots first: the measurement ID, trigger, consent settings, and parameter format.
After launch, run the same checks on a fixed schedule. That rhythm helps you catch drift before it turns into bad reporting.
| Maintenance activity | Frequency | Tools |
|---|---|---|
| Check dashboards for zero conversions or count mismatches against GA4 and CRM | Daily | GA4 Realtime, CRM export, dashboard alerts |
| Audit lead magnet flows in GTM Preview, DebugView, and reconcile GA4 conversions with email and ad data | Weekly | GTM Preview, GA4 DebugView, platform analytics |
| Full audit: tags, triggers, parameters, consent, timezone, and currency; update event schema for new or retired lead magnets; tune alert thresholds | Monthly | GTM, Tag Assistant, GA4 Admin |
If you use Subpage.co to host gated content or whitepapers, compare its lead counts against GA4 conversion totals at least once a week. When that gap keeps showing up, it’s often a sign of a tagging, filter, attribution, or webhook issue.
Conclusion: the core setup steps to remember
A real-time analytics setup for lead magnets doesn’t need to be big to be useful. It needs to be accurate and easy to act on.
The core setup is straightforward:
- Define your events
- Install GA4 and GTM cleanly
- Build a focused dashboard
- Add alerts for changes that matter
- Review the setup on a fixed schedule
Real-time analytics only works when events, dashboards, and alerts stay aligned.
FAQs
How many events should I track first?
Start with the final conversion action. Then map the 4 to 6 steps people take to get there.
At each stage, track clear events you can measure, like form_start and form_submit. That gives you a clean path from first action to conversion instead of a messy pile of data.
Early on, keep it simple. Don’t track too many variables. Focus on unique users by stage so you can calculate conversion rates and spot where people drop off.
What should I do if GA4 and CRM counts don’t match?
GA4 and your CRM often show different conversion numbers because they’re tracking different things in different ways.
GA4 can miss 20%–40% of conversions due to ad blockers and privacy settings. Your CRM, on the other hand, records conversions based on successful database entries.
Start by checking that your event triggers are firing the way they should. After that, make sure both systems are tracking the same step in the funnel so you’re comparing apples to apples.
How often should I check my lead magnet dashboard?
Check your lead magnet dashboard often so you can see how it’s performing and catch bottlenecks before they turn into bigger problems. With Subpage.co’s real-time analytics, you can watch conversion rates and visitor behavior as they happen.
One thing to note: the dashboard usually shows data from the past 7 days. When you review it on a steady basis, it becomes much easier to spot drop-offs, rule out technical issues, and improve your lead magnets over time.
Related Blog Posts
