

10 Follow-Up Email Templates for Lead Nurturing
Most lead nurture emails fail for one simple reason: they ask for too much, too soon.
If I had to sum up this article in a few lines, it’s this: match each follow-up email to the lead’s action, keep each message focused on one job, and move from help to proof to invitation. The sequence here covers all 10 email types you need: welcome delivery, problem education, quick tips, case study, ROI and objections, soft offer, webinar follow-up, resource upgrade, re-engagement, and breakup.
Here’s the full flow at a glance:
- Email 1: deliver the promised lead magnet right away
- Email 2: show the problem and cost of ignoring it
- Email 3: give 2–3 small action steps
- Email 4: show proof with results and numbers
- Email 5: answer fit, time, and budget concerns
- Email 6: invite the lead to a low-pressure next step
- Email 7: follow up after a webinar or event based on attendance
- Email 8: offer a deeper interactive resource
- Email 9: check in after 14–45 days of inactivity
- Email 10: send a final “close the loop” note
A simple cadence also stands out: Day 0, Day 2, Day 5, Day 10, Day 14, Day 18–21, and Day 25–30. For warmer leads, the timing gets tighter. For slower B2B deals, it stretches out. The main idea stays the same: one email, one goal, one CTA.
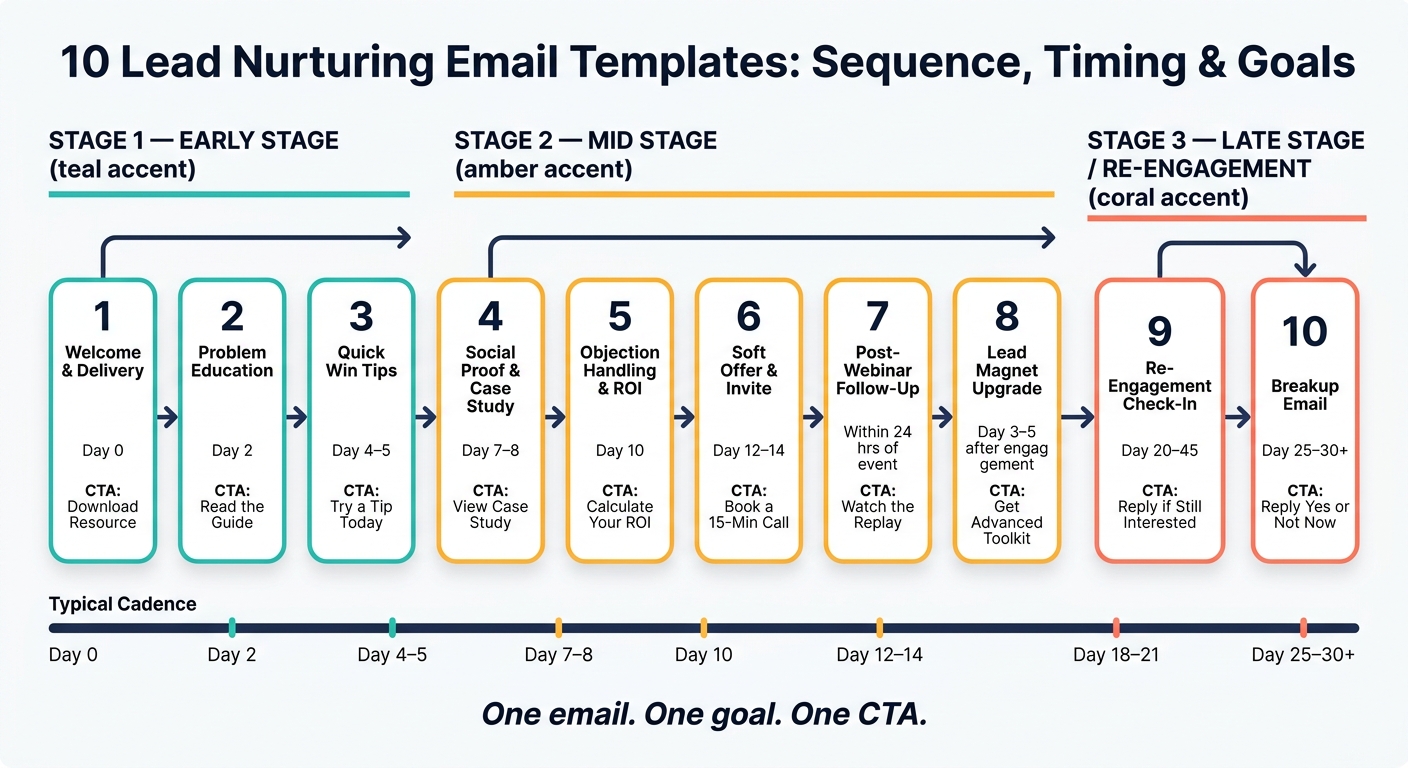
10 Lead Nurturing Email Templates: Sequence, Timing & Goals
The Lead Nurture Email Playbook: What Works and What Doesn’t
sbb-itb-b3a7196
Quick Comparison
| Main Job | Best Timing | CTA Type | |
|---|---|---|---|
| Welcome & delivery | Send asset and set expectations | Day 0 | Download/access resource |
| Problem education | Frame the issue | Day 1–3 | Read/watch/learn more |
| Quick tips | Help the lead get a small win | Day 3–5 | Try a tip or read more |
| Case study | Show proof | Day 7–10 | Read case study |
| ROI & objections | Lower risk | Day 10–14 | Reply or view ROI example |
| Soft offer | Test buying interest | Day 12–21 | Book a short call |
| Webinar follow-up | Recap and route next step | Within 24 hours | Watch replay/download asset |
| Upgrade email | Deepen interest | Day 3–7 after engagement | Get advanced resource |
| Re-engagement | Restart the conversation | Day 20–45 | Reply or click updated asset |
| Breakup | Get a final yes/no/not now | Final touch | Reply |
If you want a nurture sequence that gets more replies and more meetings, this article lays out the order, timing, and purpose for each email without making the process hard to follow.
When to Use Follow-Up Email Templates in Your Nurture Sequence
Follow-up email templates fill the gap between lead capture and sales. Use them after someone downloads a checklist, registers for a webinar, submits a contact form, or visits your pricing page.
The timing should match the lead’s intent. A high-intent action like a demo request usually needs a tighter cadence. A low-intent action, like downloading a piece of content, tends to work better with more space between sends.
Here’s a starter cadence for U.S. B2B nurture flows:
| Day | Email Purpose | Stage |
|---|---|---|
| Day 0 | Welcome and asset delivery | Early-stage |
| Day 3 | Educational deep-dive on the problem | Early-stage |
| Day 7 | Quick wins or actionable tips | Early-stage |
| Day 14 | Social proof and case study | Mid-stage |
| Day 21–30 | ROI, objection handling, soft offer | Late-stage |
Use this cadence to line up your email tone and CTA strength with lead intent.
Early-stage emails should teach, build trust, and drive low-friction clicks. Later-stage emails can bring in proof, ROI, and a clearer next step.
Timing matters here. For a high-intent trigger like a demo request or pricing-page visit, a compressed cadence such as immediate, 24 hours, 3 days, and 7 days can make sense. For a low-intent content download, a slower rhythm such as 3 days, 10 days, 21 days, and 45 days is often a better fit.
If your campaign starts with a gated asset, Subpage.co can provide the trigger point. Subpage.co can create content-focused lead magnets, gated pages, and forms that kick off the sequence.
With the timing mapped out, the next step is writing each email so it earns the click.
What Makes a Lead Nurturing Follow-Up Email Work
Once your cadence is in place, each email needs one clear job.
These templates work because they line up with a lead’s trigger, stage, and next step. Across this list, the same four parts show up every time: a clear trigger, one main goal, concise copy, and a single CTA. Remove any one of them, and the email starts to drift.
The trigger is the action that makes the message feel timely. When your opening line points to that action, the lead knows right away why you’re in their inbox.
Each email should do one thing. If a message tries to teach, answer objections, and book a call all at once, people tend to pause – and then do nothing. A better move is to pick one purpose for each send: deliver value, build trust, or ask for the next step. That focus should carry straight into the CTA.
Scannability matters. Most U.S. readers skim on mobile, so short paragraphs, line breaks, and bolded phrases make a big difference. Your main point should land within 30 seconds.
The CTA should feel like the natural next move. Specific, low-friction wording tends to beat vague asks, and the CTA should fit the lead’s stage. Early-stage leads are more likely to respond to a download or a simple reply. Warmer leads are often more open to a call or a free trial. That’s the lens to use for the templates below.
| Funnel Stage | Email’s Primary Goal | Low-Friction CTA Example |
|---|---|---|
| Early (just opted in) | Deliver value and build trust | Download your guide / Reply with a question |
| Mid (engaged, exploring) | Show proof and address doubts | Read the full case study / See how it works |
| Late (high intent) | Ask for a commitment | Book a 15-minute call / Start your free 14-day trial |
1. Welcome and Lead Magnet Delivery Email Template
This first email needs to deliver on the promise FAST and set the tone for the rest of the sequence.
Trigger: Send this email within 5 minutes of opt-in.
Primary goal: Deliver the asset and set expectations. If you haven’t built yours yet, consider these lead magnet ideas to drive more signups.
Put the lead magnet link above the fold so people can get it right away. Then add 2–4 benefit bullets to show what they’ll get before they even open the file. Finish with one short line that sets expectations for what comes next.
Also, preview the next few emails in a single line. That simple move can help keep open rates up and cut down on early unsubscribes. Then close with a reply prompt that asks what challenge brought them here.
Primary CTA: Use one main CTA – "Download Your [Lead Magnet Name]" or "Access Your [Lead Magnet Name]" – near the top and again at the bottom. If the form lives on a Subpage.co landing page, link back to that page here.
After delivery, the next email should go deeper into the problem and give more context that helps.
Use this structure:
| Copy Element | What It Does |
|---|---|
| Subject line | Confirms delivery and helps drive opens |
| Lead magnet link above the fold | Gives instant access |
| 2–4 benefit bullets | Shows what’s inside before they open the file |
| Set expectations | Helps cut unsubscribes and sets the cadence |
| Reply prompt | Encourages replies and helps build early rapport |
| Primary CTA | Keeps the action clear and focused |
2. Problem Agitation and Educational Value Email Template
Send this email after the asset is delivered. Its job is simple: take the lead from awareness to ownership of the problem.
Trigger: Send it 24–72 hours after the welcome email. That gives the lead enough time to skim what they downloaded.
Primary goal: Build problem awareness and position your brand as a trusted advisor, not a vendor.
This email should pick up where the welcome message left off. The flow is straightforward: name the problem, show what it costs to ignore, then offer one useful next step.
Start with a short hook, around 2–3 sentences, that reflects the lead’s situation in their own words. For example:
Most teams are not short on leads – they are short on qualified leads that convert. The gap usually sits in collection, scoring, or follow-up.
Then make the downside clear. Keep it practical. Talk about outcomes like lost revenue, wasted hours, or higher churn. The point is to help the reader see the problem in day-to-day terms, not in abstract language.
After that, move into a short framework or mini-checklist with 3–5 points. This gives the lead something useful right away and helps them assess where things may be breaking down.
From there, point them to a focused next asset, like a guide, checklist, or video. It should feel like the natural next step, not a hard sell. If the asset lives on Subpage.co, gate it with a short form so you can collect more data and feed lead scoring.
Primary CTA: Read the 5-minute guide, take the checklist lead magnet, or watch the 8-minute breakdown. Place the CTA once near the top and again later as an inline text link. Don’t include a demo or trial CTA in this email. That comes later, when you move from diagnosis to proof.
| Copy Element | What It Does |
|---|---|
| Problem hook (2–3 sentences) | Reflects the lead’s situation |
| Cost of inaction | Shows the cost of inaction |
| Mini-framework or checklist | Adds value and helps diagnosis |
| Educational asset link | Deepens problem awareness |
| Primary CTA (low friction) | Drives a low-friction click |
3. Quick Win Tips Follow-Up Email Template
Send this email 24–48 hours after the problem-agitation message, while the lead’s interest is still fresh. If the sequence starts from a Subpage.co lead magnet, trigger this email on download or page access. At this point, the sequence moves from diagnosis to action.
Primary goal: Build trust early by helping the lead get a small, concrete result with no commitment. Once someone gets a quick win, they start linking your brand with actual help instead of more inbox noise.
Use the same problem language, but make the reader feel progress right away. The email should read like a short note from a helpful colleague. Open with one sentence that connects straight to the prior email’s problem framing and promises a few quick wins the reader can use now. Then share 2–3 numbered tips, each with:
- one action
- one reason
- one example
Keep the writing short and easy to scan. If a tip can’t be used right away, cut it.
Near the end, add one short product mention that shows how your solution helps put the tip into practice. Then close with a single low-friction CTA, such as "Read the full guide."
| Copy Element | What It Does |
|---|---|
| Context hook (1 sentence) | Connects the email to the earlier problem framing |
| 2–3 numbered quick tips | Gives immediate, actionable help |
| Mini-script or copy example per tip | Makes each tip easy to use right away |
| Light product tie-in (1 line) | Links the win to your solution in a natural way |
| Primary CTA (low friction) | Moves the lead to the next learning step |
4. Social Proof and Case Study Email Template
After you’ve shared a quick win, it’s time to show proof. This email usually works best as the second or third follow-up, about 3–7 days after a lead magnet download, webinar, pricing-page visit, or an unanswered demo request. At this stage, stop teaching and start proving.
Primary goal: move the lead from interest to confidence.
The best way to do that is to show a customer who looks like them in the ways that matter: same industry, same role, same company size, or same use case. And don’t lean on vague praise. Specific numbers matter more for skeptical readers and people focused on ROI.
A simple before-and-after setup works well:
- the challenge
- the fix
- the result
Keep the email body short, around 150–300 words. Once the result is clear, send the reader to the full case study.
If the lead came in through a Subpage.co whitepaper or business-case page, link to a case study that matches that entry point. That kind of alignment makes the email feel more direct and more useful.
For the CTA, keep it low pressure. Phrases like See how it worked or Read the full case study make it easy for someone to take the next step without feeling pushed. If the lead is warmer, Book a 15-minute walkthrough can work well. A stronger CTA makes sense only when the result is strong and the lead is already warm. That proof then sets up the next email, where you deal with objections and ROI.
| Copy Element | What It Does |
|---|---|
| Subject line with a specific result | Sets relevance before the email is opened |
| Customer problem (1–2 sentences) | Creates immediate identification with the reader |
| Before-and-after outcome with a measurable result | Builds credibility through concrete evidence |
| One-line testimonial (optional) | Adds a human voice to the data |
| Low-friction CTA | Invites the next step without pressure |
5. Objection Handling and ROI Email Template
Once you’ve shown proof, the next sticking points are usually budget and fit. This email works best as email 2–4, or about 24–72 hours after someone visits your pricing page, attends a webinar, books a demo, or goes through a product tour. By then, the lead is interested. They just haven’t made up their mind yet.
Primary goal: lower the sense of risk and give the lead numbers they can use to make the case inside their company.
Start by saying the hesitation out loud. Then answer two or three common objections in a short, plainspoken way. In B2B, the usual ones are:
- budget
- time
- fit
- risk
For each one, keep your reply brief and tied to proof. If price is the issue, don’t jump straight to a discount. Lead with ROI instead. Simple math usually does the job. For example, if each team member saves just 3 hours per week and their average loaded cost is $60/hour, that works out to about $9,360/year for a team of five.
If the lead came from a Subpage.co gated business case or ROI calculator, mention that asset directly and shape the example around their setup.
Keep the email under 125 words and stick to one CTA. A low-pressure CTA works best, such as: "Reply for a one-page ROI example."
| Copy Element | What It Does |
|---|---|
| Subject line naming the objection | Signals relevance before the email is opened |
| Opening line that acknowledges doubt | Builds trust by showing you understand the hesitation |
| 2–3 objection–answer pairs with data | Addresses concerns without sounding defensive |
| Simple ROI calculation in USD | Gives the lead numbers they can share internally |
| Low-pressure CTA | Moves the conversation forward without pressure. |
6. Soft Offer and Low-Pressure Invite Email Template
After proof and objection handling, send a soft offer to gauge interest without pushing too hard. This email fits best in the middle of the sequence, after one or two value emails. By then, the lead has already seen useful advice and proof, so asking for a small next step feels reasonable. They have enough context to look at a low-risk offer and decide if it makes sense.
Use this email to spot who’s ready to move. It tends to work best after quick wins, proof, and ROI content have already lowered resistance. The offer should feel like a natural next step from the help you’ve already shared, not a hard sell.
The structure is simple: mention what the lead already downloaded or engaged with, introduce the soft offer in a sentence or two, then add a clear reassurance. A repeatable formula is context → empathy → offer explanation → reassurance → single CTA. Saying there’s no pressure can lower friction and make the next step feel easier.
Here’s a simple template that puts that approach into action:
Subject: Want help putting your follow-up plan into action?
Hi [First Name],
Last week you downloaded our Lead Nurture Checklist to tighten up your follow-up process.
If you’re still sorting through what to tackle first, book a free 20-minute follow-up audit for three quick wins on your current sequence.
No pitch, no pressure – just practical help to get more replies and meetings.
→ Schedule your free 20-minute audit
Link the CTA to a landing page that explains the offer and collects context. That keeps the email short and lets the page do the heavier work.
Stick to one CTA that matches the invite. Soft offer emails with a single, clearly labeled action tend to work best. Keep the wording focused on the benefit and keep the tone calm. If it helps, book a time – the sense of control is a big part of why the offer feels low risk.
| Copy Element | What It Does |
|---|---|
| Reference to prior content | Creates continuity |
| One-sentence offer description | Keeps the ask clear |
| Explicit "no pressure" reassurance | Lowers perceived risk |
| Benefit-led CTA with time expectation | Makes the next step easy |
7. Post-Webinar or Event Follow-Up Email Template
When the trigger is a webinar or live event, don’t treat it like a standard nurture email. Send it sooner. For attendees, send within 1–2 hours after the event. For no-shows, send within 12–24 hours. That speed matters. Webinar follow-up emails can see 39%–50% open rates, so the right timing and the right message can make a big difference.
To make the email feel tied to the event, mention one specific moment from the session. It could be a framework, a demo, or a point the speaker made that stood out. Then line up the CTA with what the attendee is likely to want next.
A simple flow works well here: thank, recap, replay, CTA.
Here’s a single-path attendee version:
Subject: Your replay + 3 takeaways from today’s session
Hi [First Name],
Thanks for joining us today for [Webinar Title]. Here’s a quick recap of what we covered:
- [Key Takeaway 1]: One sentence summary
- [Key Takeaway 2]: One sentence summary
- [Key Takeaway 3]: One sentence summary
You can watch the full recording here: → [Watch the Replay]
Next step: [specific action]. I’ve put together a short [checklist/guide/walkthrough] that maps directly to the session content.
→ [Download the Implementation Checklist]
For no-shows, start with a brief apology and put the replay first, before anything else. That’s the easiest way to meet the reader where they are. Keep the CTA low-friction too. A 15-minute highlight reel is often easier to say yes to than a full replay.
You should also segment these groups from the start so the follow-up fits what each person actually did.
| Audience Segment | Lead Copy | Primary CTA |
|---|---|---|
| Attended live (75%+ watched) | Recap plus advanced resource | Book a call or request a demo |
| Attended live (partial) | Replay link plus key takeaways | Watch the full recording |
| Registered, did not attend | Brief apology plus summary | Watch a 15-minute highlight reel |
8. Lead Magnet Upgrade and Cross-Sell Email Template
Once you’ve sent proof and softer offers, this is the email to use when you want to introduce a deeper, closely related resource. The goal is simple: turn repeat interest into another download and move the lead further down the funnel.
Send it after a clear engagement signal, like a few email opens or clicks, a second download, webinar attendance, or repeat visits to key pages. For shorter sales cycles, wait 2–4 days. For longer ones, give it 3–7 days.
The key idea here is a value bridge. In plain English, that means you make a short, direct link between what the lead already has and why the next resource makes sense. The new offer should feel like the natural next move, not a random extra. Tie the upgrade back to the first resource, and give them one clear next step. If you’re cross-selling, keep it close to the same topic.
Use that setup in the template below.
Subject: Next step after your [Lead Magnet Name]: advanced templates
Hi [First Name],
You grabbed our [Original Lead Magnet] a few days ago – nice work taking that first step.
Most people who use it run into the same question next: how do I actually build this out?
That’s exactly what this covers: → [Download the Advanced [Topic] Playbook]
Inside, you’ll get:
- A fillable planning workbook with fields for estimated monthly revenue impact (in USD) and target deadlines
- 2–3 short case studies showing real results, such as a +27% lead-to-opportunity rate or +$45,000 in quarterly revenue
- Step-by-step workflows so your team can get everything live in under 7 days, whether you’re a 2-person team or a 50-person department
Think of it as the pro version of the guide you already have.
→ [Access the Full Toolkit]
Keep the CTA focused on value. Phrases like Get the advanced playbook or Access the full ROI toolkit work well because they tell the reader what they get, not just what to click.
If the upgrade lives on a gated page – for example, one built with a landing page tool – you can use that form to collect a stronger qualifier, like team size or budget range in USD. That extra detail can help with lead scoring.
After the email goes out, pay attention to downstream buying signals. Check whether it leads to pricing-page visits, demo requests, or product tour starts.
9. Re-Engagement Check-In Email Template
This email is for leads who’ve gone quiet: no opens, no clicks, and no replies. It usually makes sense after 21–30 days of inactivity, 30–45 days in a longer sales cycle, or 3–4 unopened emails. This is the point where you try to restart the conversation before a breakup email closes the loop.
The goal is simple: reopen the thread with one question or one easy next step. Don’t add pricing, stack multiple CTAs, or introduce a new offer. That just adds friction.
Start by pointing to the original trigger. Then acknowledge that priorities shift. After that, give them one easy way to re-engage. Keep it short, ideally under 150 words. Plain text tends to work best here because it feels more personal and conversational.
Subject: Still working on [specific goal from their original download]?
Hi [First Name],
You downloaded our [Lead Magnet Name] a few weeks back – I’m checking in.
Has your focus on [core problem or outcome] changed, or is it just on pause?
If it is, here’s one updated resource: → [View the Updated Resource]
If not, reply ‘Not now’ and I’ll pause these emails.
The CTA should be as easy as possible. A reply prompt like Reply with 1, 2, or 3: 1) Still interested, 2) Later this year, 3) Not a fit. works well because it only takes a few seconds and gives you a clear read on where the lead stands.
If the updated resource sits on a gated page built with Subpage.co, that click can also act as a fresh engagement signal.
Anyone who replies or clicks should go back into the active nurture path. Everyone else should get the breakup email.
10. Breakup Email Template
If the re-engagement check-in gets no reply, send this final email. Use it after the last unanswered touch in a 5- to 8-email cadence.
The goal is simple: get one last response – yes, no, or not now – before you take the contact out of active nurture.
Keep the message short, polite, and conversational. Mention the original lead magnet, webinar, consultation request, or pain point that brought them into the sequence. That small detail makes the email feel tied to their interest, not like a generic last attempt. You also want to note the silence without sounding annoyed, then make the next step dead simple.
Subject: Should I close the loop?
Hi [First Name],
I’ve reached out a few times since you downloaded [Lead Magnet Name], so I’ll pause outreach for now.
If [core problem] becomes a priority again, reply yes and I’ll send a relevant resource.
Reply yes or not now.
After you send this, pause active outreach unless they reply or click. If they click a final resource – like a personalized landing page or gated page built with Subpage.co – move them back into active nurture. If they stay silent, shift them to dormant or lower-frequency nurture.
How to Build an Automated Sequence From These 10 Templates
Use the templates above as a sequence, not a grab bag. In most cases, 5 to 8 templates is enough. The right number depends on lead intent and how long the sales cycle usually takes.
Match the Sequence to the Lead Trigger
The trigger should shape the order.
If someone downloads a lead magnet, start with education and a few quick wins before you make any offer. If someone requests a demo, intent is higher, so you can move sooner into product-focused emails and a more direct CTA.
Use the table below to match each trigger to the right order.
| Lead Trigger | Recommended Templates | Sequence Length |
|---|---|---|
| Checklist or whitepaper download | 1 → 2 → 3 → 4 → 6 → 9/10 | 6–7 emails |
| Webinar registration | 7 → 3 → 4 → 6 → 9/10 | 5–6 emails |
| Demo request or free trial signup | 1 → 3 → 4 → 5 → 6 → 10 | 5–6 emails |
| Consultation request | 1 → 2 → 4 → 5 → 6 → 9/10 | 6–7 emails |
If Subpage.co delivers the gated asset, send Template 1 right after form submit. Then follow with Templates 2 and 3 based on that download.
Use a Simple 5- to 8-Email Cadence
A practical 7-email cadence looks like this: Day 0 (welcome and delivery), Day 2 (problem-focused education), Day 5 (quick wins), Day 10 (case study), Day 14 (objection handling), Day 18–21 (soft offer), and Day 25–30 (re-engagement or breakup).
The basic idea is simple: give value first, then build toward stronger asks. If you want a tighter 5-email version, combine the education and social proof emails and use Day 0, 3, 7, 14, and 21.
Once the base cadence is in place, adjust the timing to fit the deal length.
Adjust Timing Based on Sales Cycle Length
For short sales cycles, like low-priced B2C products or SaaS tools under $100/month, compress the sequence to 5–6 emails over 10–14 days. Keep gaps between emails at 1–3 days. In this setup, move faster to Templates 4, 5, and 6 because the buying decision is simpler.
For longer B2B cycles tied to enterprise deals or consulting work, stretch the sequence to 60–90 days, with 7–10 days between later emails. In that case, you can reuse Template 4 from different angles. For example, one version might focus on ROI for a finance audience, while another leans into implementation ease for an IT team. As the decision gets more expensive and more complex, leave more space between sends and put more weight on education than promotion.
Once the timing is set, map one CTA to each stage.
Set One CTA Per Email Stage
Each stage should do one job.
Early emails (Templates 1–3) work best with low-friction CTAs, such as reading an article, downloading a related resource, or replying with a short answer. Mid-sequence emails (Templates 4–5) can ask for a bit more, like viewing a case study, using an ROI calculator, or answering a quick question. Late-stage emails (Templates 6, 9, and 10) are the right place for stronger CTAs, such as booking a 15-minute call, starting a free trial, or confirming whether they want to keep the conversation going.
Template Planning Table
This table maps each template to the moment that should set it off, when to send it, what job it needs to do, and the CTA that pushes the lead to the next step. Use it as a simple check before you automate the sequence.
| # | Template | Trigger | Ideal Send Timing | Primary Objective | CTA |
|---|---|---|---|---|---|
| 1 | Welcome & Lead Magnet Delivery | Form submission / lead magnet download | Immediately (Day 0) | Deliver promised value and confirm access | Download your resource |
| 2 | Problem Agitation & Educational Value | Lead magnet delivered; no deeper engagement yet | 1–2 days after delivery (Day 2) | Highlight the core pain point and educate | Read the full guide |
| 3 | Quick Win Tips | Lead opened or clicked the welcome email | 2–3 days after the previous email (Day 4–5) | Create momentum with fast, actionable value | Try this tip today |
| 4 | Social Proof & Case Study | Mid-sequence engagement with no conversion yet | After initial engagement (Day 7–8) | Build credibility and reduce uncertainty | View the full case study |
| 5 | Objection Handling & ROI | Lead has shown interest but still has cost or complexity concerns | After the social proof email (Day 10) | Remove friction and address cost or complexity concerns | Calculate your ROI |
| 6 | Soft Offer & Low-Pressure Invite | Strong engagement such as multiple clicks, replies, or repeat visits | Day 12–14 | Move toward a sales conversation without hard pressure | Book a 15-minute call |
| 7 | Post-Webinar or Event Follow-Up | Webinar attendance or no-show | Within 24 hours of the event | Recap value and offer a clear next step | Watch the replay |
| 8 | Lead Magnet Upgrade & Cross-Sell | Engagement with a specific resource | 3–5 days after download | Deepen interest with a related, higher-value offer | Get the advanced toolkit |
| 9 | Re-Engagement Check-In | 14–30 days of inactivity | Day 20–45 | Revive interest before the lead goes cold | Reply if this is still a priority |
| 10 | Breakup Email | No reply after the full sequence | Final touchpoint (Day 25–30+) | Close the loop or reopen the conversation | Reply if you still want help with [problem] |
Conclusion
Promotional blasts interrupt prospects. A well-built nurture sequence earns attention by sending the right message at the right time, based on what the lead did – not when it’s most convenient to hit send. That’s the idea behind the 10 templates above.
Put simply, these templates work best as one sequence, not 10 separate emails.
If you use Subpage.co to create the lead magnet and gated page, connect its form to your email platform so the sequence starts automatically when someone signs up. From there, test the sequence and refine it over time.
Match your cadence to your sales cycle. Track opens, clicks, replies, and sales conversions. Then test one variable at a time. The best nurture sequences stay current.
FAQs
How many nurture emails do I actually need?
It depends on your goals and how involved your leads are.
A standard nurture sequence usually includes 4–7 emails. If you’re working with complex B2B leads, that often stretches to 4–8 emails sent over 2–4 weeks.
Welcome sequences usually begin with 2–4 emails over 3–7 days. Re-engagement campaigns are often shorter, with 2–3 emails over 1 week.
You can also use Subpage.co engagement data to fine-tune your sequence.
How should I change the cadence for high-intent leads?
For high-intent leads, like people who keep coming back to your pricing page, use a short delay of 1 to 3 hours. Make the message feel directly tied to what they were looking at.
If a lead hits a qualified threshold, reach out within 5 minutes when you can. That works much better than waiting 30 minutes. Shape the copy around their behavior, adding more detail, reassurance, or social proof.
What should I track to improve my follow-up sequence?
Track two areas: engagement and outcomes.
For engagement, keep an eye on:
- Open rates
- Click-through rates
- Sequence completion
- Drop-off points
For outcomes, look at:
- MQL/SQL volume
- Pipeline contribution
- Lead-to-customer conversion
- Pipeline velocity
Also watch unsubscribe rates. They can tell you when a sequence is pushing too hard, missing the mark, or just losing people along the way.
If you use Subpage.co, its analytics can help you monitor content engagement and refine your sequence.
Related Blog Posts
